Do you want to build your first website? cPanel hosting is one of the easiest and most reliable ways to get started. Used by millions of site owners worldwide, cPanel offers a user-friendly control panel that makes managing your hosting simple. And it doesn’t matter if you’re not a tech expert. It’s especially popular in 2025 for its clean layout, helpful tools like Softaculous for one-click installs, and free Auto SSL for quick HTTPS setup.
This cPanel hosting guide is ideal for beginners, bloggers, and small business owners who want to launch a website without hiring a developer. Should you need to set up a personal blog or a company site, cPanel gives you full control over your files, databases, emails, and more; all from one dashboard.
In this step-by-step cPanel tutorial for beginners, you’ll learn how to set up a website using cPanel. We’ll cover the essential tasks like connecting your domain, uploading website files or using the built-in File Manager, and setting up SSL for site security. Also, we’ll discuss how to install WordPress with cPanel in just a few clicks. After reading, you’ll have everything you need to launch your website with confidence. Let’s get started.
Step 1: Choose a Reliable cPanel Hosting Provider
You need to pick the right host before you can set up your website using cPanel. Not all hosting services are created equal, especially when it comes to speed, support, storage, and security. If you’re following this cPanel tutorial for beginners, start with a hosting provider that offers free SSL, one-click WordPress installs, and strong customer support. Below are the top cPanel hosting providers in 2025 that support a smooth website setup step-by-step, if you’re launching a blog, portfolio, or small business site.
Bluehost
Bluehost is one of the most beginner-friendly hosts with full cPanel support across all plans. Shared hosting starts at $3.95/month, plus it offers 10 websites, 10 GB SSD, a free domain (1st year), free SSL, and 24/7 phone/chat support. It’s especially great if you plan to install WordPress with cPanel thanks to its one-click installer. Bluehost also provides cPanel-based VPS and custom reseller options for agencies. As a result, it is a top choice.
- Best for: Beginners and small business owners who want reliable support and an easy start.
- Features: Free domain, SSL, Softaculous app installer, and unlimited traffic.
Hostinger
Hostinger doesn’t offer traditional cPanel on shared hosting. Instead, it uses a custom hPanel, which is sleek and easy to use. Shared hosting starts at $2.99/month and includes 100 websites, 100 GB SSD, and free SSL. However, if you want actual cPanel, choose one of Hostinger’s VPS plans starting at $4.99/month, which support cPanel as an optional upgrade. Agencies can also explore their affiliate-accessible reseller plans.
- Best for: Developers or agencies needing cPanel VPS at a low cost.
- Features: High-speed VPS, optional cPanel, and custom control panel on shared plans.
HostGator
HostGator is ideal if you want traditional cPanel hosting across all tiers. Shared hosting begins at $3.75/month with unmetered bandwidth, free SSL, and a website builder. You can also get VPS hosting from $23.95/month and cPanel reseller hosting starting at $19.95/month. HostGator is known for solid uptime and includes features like free migrations and Google Ads credits. As a result, it is a reliable choice for a cPanel domain setup tutorial.
- Best for: Users who want a flexible upgrade path from shared to reseller/VPS
- Features: Free SSL, 1-click installs, and free domain transfer.
Namecheap
Are you on a budget? Namecheap is one of the most affordable cPanel hosting providers in the U.S. Shared hosting starts at just $1.98/month (billed annually) and includes 3 websites, 20 GB SSD, free SSL, CDN, and a domain with privacy protection. Their Stellar Plus plan gives you unlimited sites and storage for just $2.98/month. Namecheap also offers VPS plans from $6.88/month (cPanel license extra) and cPanel/WHM reseller hosting starting at $19.88/month.
- Best for: Beginners looking for cheap hosting with full cPanel features.
- Features: Free CDN, SSL, 50 free SSLs/year, and Softaculous installer.
Step 2: Register a Domain and Connect It to Your Hosting
The first thing you need to create a website in cPanel is a domain name. If you don’t have one yet, register it through any trusted domain registrar. Choose a name that’s short, clear, and easy to remember. Stick with common extensions like .com, .net, or .org unless you need something specific. Once you find a domain that’s available, complete the purchase and save your login details so you can manage your DNS settings later.
Now it’s time to connect that domain to your cPanel hosting account. This step is critical to ensure your site is accessible online and is a core part of any cPanel tutorial for beginners. Depending on your hosting type, there are two ways to do it:
Shared Hosting: Update Nameservers
If you’re using shared cPanel hosting, your host will provide two nameservers. And that will be something like ns1.yourhost.com and ns2.yourhost.com. It usually takes 24 to 48 hours for the updates to fully take effect across the internet. After that, your domain will be pointed to your cPanel hosting guide environment, and you’ll be ready to upload your files or install WordPress with cPanel. Follow the steps below to get it done:
- Log into your domain registrar’s dashboard.
- Find the DNS or Name Servers section for your domain.
- Replace the existing nameservers with the ones from your hosting provider.
- Save your changes.
VPS Hosting: Point the Domain Using A Records
The setup is slightly different if you’re on a VPS because you will manage DNS settings yourself. However, just like nameservers, DNS changes can take up to 24 hours to propagate. Once that’s done, your domain will load your website directly from your VPS-hosted cPanel environment. Follow the procedures below to do it:
- Get your server’s public IP address from your hosting dashboard or welcome email.
- Log into your domain registrar’s DNS management panel.
- Remove any existing A, AAAA, or CNAME records for @ or www.
- Create two new A records:
- @ → your server IP
- www → your server IP
- Save the records.
Step 3: Log In to Your cPanel Dashboard
Logging into your cPanel is one of the first key steps in any website setup step-by-step process. If you’re a beginner, blogger, or small business owner, learning how to access cPanel is essential. This section of our cPanel hosting guide will show you exactly how to do that.
How to Access cPanel
You can access your cPanel account in one of two ways, depending on your hosting provider:
1. Through your Hosting Dashboard (Recommended for Beginners):
- Log in to your hosting provider’s account (e.g., Bluehost).
- Find your hosting plan and click “Manage.”
- Look for a button labeled cPanel or Advanced Settings.
- Click it to open your cPanel without needing separate login details.
2. Via Direct URL:
- Open a browser and type: yourdomain.com/cpanel or yourdomain.com:2083.
- Use the cPanel username and password from your welcome email.
- This takes you straight to your cPanel login page.
What You’ll See in the cPanel Dashboard
Once logged in, you’ll land on the main cPanel dashboard. It’s designed to be beginner-friendly with icons organized into sections. Let’s take a look at the things you will find there:
- Files: For uploading, editing, and backing up your site files.
- Databases: For creating and managing MySQL databases.
- Email: To set up custom email addresses like info@yourdomain.com.
- Domains: For managing add-on domains, redirects, and subdomains.
- Software: This is where you’ll find Softaculous to install WordPress with cPanel.
Key Features You Should Know First
To get started, focus on the most important tools; they are as follows:
- File Manager: Use this feature to upload your site’s content directly to the public_html folder.
- Softaculous Apps Installer: One-click this feature to install WordPress and over 400 other scripts.
- MySQL Databases & phpMyAdmin: This one is required for running CMS platforms like WordPress.
- Email Accounts: Use this to set up and manage professional email using your domain.
- SSL/TLS: This will help you secure your website with HTTPS, and is often free via AutoSSL or Let’s Encrypt.
Step 4: Upload Your Website Files
Once your domain is connected, the next part is getting your actual website files online. If you’re building a custom HTML site or using WordPress, cPanel gives you two main ways to do this: using File Manager or installing via Softaculous. Below, we’ll walk you through both.
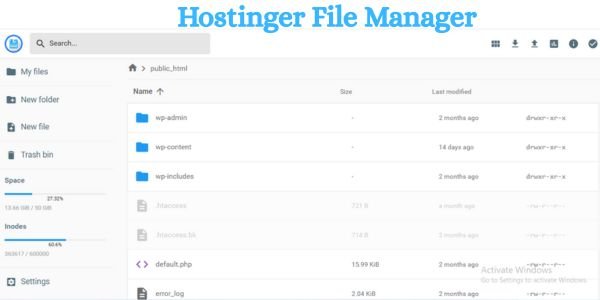
Uploading HTML or PHP Files via File Manager
If your website is made with custom code like HTML, CSS, JavaScript, or PHP, you’ll upload those files manually using cPanel’s File Manager.
Here’s how to do it:
- Log into your cPanel dashboard.
- Scroll to the Files section and click File Manager.
- Open the public_html folder; this is where your site files should go.
- Click the Upload button at the top.
- Choose your files (or a ZIP archive of your website) from your computer.
- If uploading a ZIP file, right-click it once uploaded and select Extract.
What you should include:
- Your homepage should be named index.html or index.php.
- Place your stylesheets inside a css/ folder.
- Store JavaScript files in a js/ folder and images in an images/ folder.
- Keep everything inside public_html to make it accessible on the web.
Once uploaded, visit your domain (e.g., yoursite.com) to see your live site.
Installing WordPress with Softaculous (Recommended)
For most beginners and small business owners, the easiest way to create a website in cPanel is to install WordPress. Luckily, cPanel includes Softaculous, a one-click installer that handles everything for you.
To install WordPress with cPanel, follow the steps below:
- In your cPanel dashboard, scroll down to Softaculous Apps Installer or search for “WordPress.”
- Click Install Now.
- Choose your domain from the dropdown.
- Leave the “Directory” field blank if you want WordPress installed at your main domain (e.g., yoursite.com).
- Fill in:
- Site Name and Description
- Admin Username and Password
- Admin Email
- Choose your language and optional plugins.
- Select a theme (optional), then click Install.
In less than a minute, you’ll get a link to your new WordPress site and its admin dashboard. This is the fastest way to set up a website using cPanel with full content management features.
Step 5: Configure SSL for HTTPS
One of the final and most important steps in the whole process is enabling HTTPS using an SSL certificate. It protects your users’ data, builds trust, and improves your SEO rankings. Most cPanel hosting providers now offer free SSL via Let’s Encrypt, and with a few clicks, you can secure your site right from your cPanel dashboard.
How to Install a Free SSL Certificate in cPanel
The following is the procedure to install SSL using Let’s Encrypt through AutoSSL:
1. Log in to cPanel
From your hosting dashboard, find and click “SSL/TLS Status” under the Security section.
2. Select your domain
You’ll see a list of domains associated with your hosting. Tick the checkbox beside the domain(s) you want to secure.
3. Run AutoSSL.
Click the “Run AutoSSL” button. This tells cPanel to generate and install a free SSL certificate from Let’s Encrypt.
4. Wait for confirmation.
Within a few minutes, your domain status will show a green padlock or a message like “AutoSSL Domain Validated.” That means your SSL is now active and ready to go.
Optional: Use cPanel’s Force HTTPS Redirect (If Available)
Some hosting providers let you toggle HTTPS redirection directly. The following illustration shows how to get it done:
- Go to the Domains section in cPanel.
- Find your domain and switch on the Force HTTPS Redirect toggle.
Step 6: Test and Launch Your Site
After setting up WordPress in cPanel, it’s time to preview and go live. Let’s show you how to go about that below:
Preview Your Site Before Launch
- Visit Your Domain: Once DNS updates (usually within 24–48 hours), open your domain in a browser to see your live site.
- Check SSL: If installed, make sure your site loads over https:// with a padlock icon. If not, use cPanel’s SSL/TLS Status to activate it.
- Do you need early access? Some cPanel hosts offer a Website Preview option. Otherwise, wait for DNS to finish propagating before final testing.
Check and Fix Common Issues
If something’s not working, don’t panic. Here are quick fixes for the most common problems:
- 404 Errors: In WordPress, go to Settings > Permalinks and click Save Changes twice. This resets your link structure and usually fixes missing pages.
- File Permissions: Open File Manager in cPanel, right-click folders and set them to 755, and files to 644. This ensures WordPress can load your content properly.
- Other Quick Checks:
- Make sure your homepage has an index.php or index.html file.
- Disable any maintenance mode plugins.
- Double-check that all plugins and themes are installed correctly.
Test every page before sharing your site. It only takes a few minutes but ensures a smooth launch.
Confirm Launch
- Test key pages: Open your site on desktop and mobile. Make sure all pages, forms, and features work smoothly.
- Check links and images: Click menus, buttons, and media to ensure nothing is broken.
- Clear cache: Clear your browser or plugin cache to see the latest version.
- Final review: Check for typos, missing logos, and correct SEO settings. If all looks good, you’re alive and ready for visitors!
Conclusion
In 2025, cPanel remains one of the most trusted and beginner-friendly ways to launch a website. It powers millions of websites worldwide because it simplifies everything. We’re talking about connecting your domain, installing WordPress, managing files, and securing your site with SSL.
Are you building a blog or a business site? The process is quick, reliable, and doesn’t require coding skills. With built-in tools like Softaculous and AutoSSL, even first-time users can go live in under an hour.
If you’re serious about creating a professional online presence, cPanel hosting is a proven and effective solution. Your website is now ready, secure, functional, and online.